Basic infos
This page will regroup the generic info to create a Dlc, whatever the content you want to put it it.
Structure
Section titled “Structure”To create a DLC, you’ll create a empty directory inside the project assets and add the content needed for the DLC. In some rare case where the DLC does not contain asset bundle, you can create directly the assets and zip them, but it’s more difficult.
The basic content of the source data of a dlc is :
any_name.asset : A scriptable object of type DlcPackage. See below how to create it. It is used to setup an build the dlc from Unity.- bundles/ : A directory containing asset bundle content to create.
- files/ : A directory containing file to directly copy into the dlc, mostly json file.
- translation/ : A directory where to put translation file to be build when creating a new language.
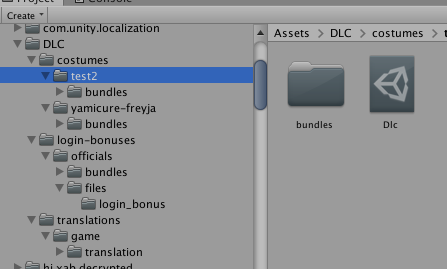
Sample of the structure of some dlc in a project :
DlcPackage file
Section titled “DlcPackage file”This is a asset to create at the root of the Dlc source directory. Right click in the directory > Create > Scriptable Objects > DLCSettings. You can name it like you want.
When you select it, you can see it’s properties to edit in te Inspector
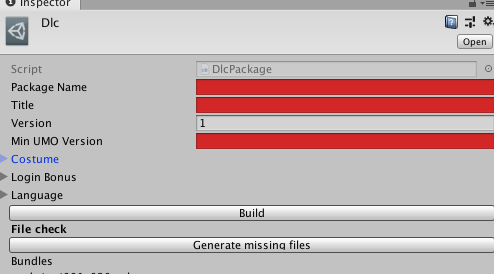
The generic properties to fill are :
- Package Name : An id for the package. Allowed character are azAZ09_- . The field will be red if the name is not compatible.
- Title : The title of the DLC displayed in the list when installed.
- Version : The version of the DLC. Only used as visual information.
- Min UMO Version : Min compatible UMO version, in the format X.Y.Z. The DLC won’t be usable on UMO with a lower version.
The next part define the content. See the specific docs to know how to setup.
File check
Section titled “File check”This section will update depending of the content setup to show you what file are expected when known.
If some required file are missing, you can click the Generate missing file button to create directories and placeholder file to replace.
Asset bundles
Section titled “Asset bundles”You can setup asset bundle to be created. It is required for some type of DLC. When the dlc is enabled, all bundle will be accessible from the game. If you create a bundle with the same path and name as one existing in the game, it will reoplace it. There is no priority system if multiple dlc override the same bundle.
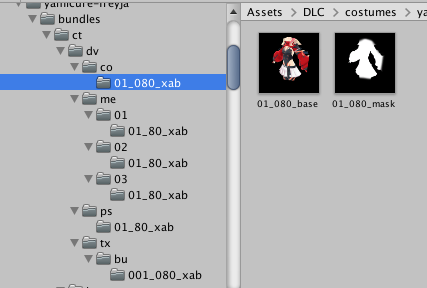
To setup an asset bundle, create a directory with the extension _xab in the wanted directory hierarchy, and put the file you need in it.
Here is an example for a costume dlc :
Special texture format
Section titled “Special texture format”In UtaMacross, a texture with alpha are split in two opaque texture to prevent problem with alpha blending. UMO has a tool to help creating it :
- Put the texture with alpha in the directory.
- Right click on it > UMO > Split Texture Alpha.
- This will create 2 texture with suffix _base and _mask.
Translated string
Section titled “Translated string”When configuring the DLC content, some will require translated string. For now, the UI is not made and the data is 2 lists, Keys ad Values.
Using a text existing in a bank
Section titled “Using a text existing in a bank”If you want to use a text already in the game, you can setup it like that :
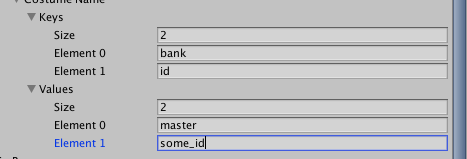
Add 2 entry in Keys : “bank” and “id”, and in Values, add an entry for the bank to use and one for the texte id.
Using a new text
Section titled “Using a new text”If you need a new text, setup it like that :
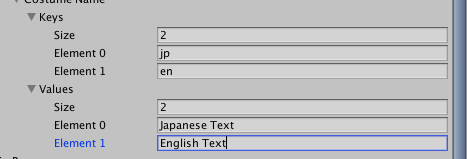
Add one entry in Keys for each language id, set at least the “jp” one. And add the same number of text in Values, one for each language.
Build the DLC
Section titled “Build the DLC”Use the Build button from the DlcPackage file to build the DLC.
After the build, you’ll find the DLC files in the directory Unity/Build/TmpBundles in a directory with the dlc package name.
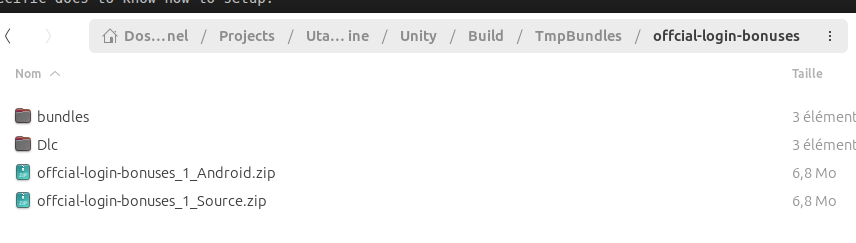
package-name_version.zip orpackage-name_version_platform.zip : This is the DLC. The platform is in the name if the dlc has bundles.package-name_version_Source.zip : The content of the dlc source files in the project. This allow others to improve it, or if you can’t build for Android, send it to me (Xele) so I can build a Android version.